| Additional Support |
 |
|
| |
Address
Centerline Steel, LLC
208 W Davis Industrial Dr.
St. Augustine, FL 32084
Call - 888-960-3854
Email – [email protected]
Customer Support Hours
- Monday – Friday 8:30am – 5pm EST
- Saturday Closed
- Sunday Closed
The following holidays will be observed by Centerline Steel:
- New Year’s Day Closed
- Memorial Day Closed - Remember those who sacrificed everything, the debt cannot be repaid.
- Independence Day Closed - Celebrate the founding of our great nation!
- Labor Day Closed
- Veterans Day Closed - Thank those who serve and have served our country.
- Day before Thanksgiving Close at noon EST
- Thanksgiving Day Closed - Count your blessings and spend time with family & friends.
- Day after Thanksgiving Closed
- Christmas Eve Closed
- Christmas Day Closed - Celebrate the Reason for the Season, Jesus Christ!
- Day after Christmas Closed
- New Year’s Eve Close at 3pm EST
|
| Centerline Brackets Photo Contest 2019 |
| |


FAQ’s
Can I enter more than one category? Yes. You may enter as many categories as you have bracket styles.
Can I enter more than once in the same category? Yes. If you are an installer, kitchen designer/architect, general contractor or someone who uses the same bracket style regularly and have pictures from multiple projects, each one can be entered in the contest. Each entry must meet contest rules.
What if I have older pictures from a previous project? There is no time frame for when your project was completed. So long as you are a verified customer and the pictures meet entry requirements we encourage you to submit them for a chance to win.
Tips for Pictures
- The clarity and quality of your photo counts for half of the points earned during judging. Blurry, out-of-focus pictures may disqualify your entry. If you don’t have a steady hand, consider using a tripod.
- STAGE YOUR PHOTO! Remove any trash, construction debris, tools, cleaning supplies etc. from the picture. Check that cover plates are on outlets, no electrical wires showing. This is especially important for the finished project photo. Remember, 30% of the scoring criteria is based on marketability/commercial appeal of your photos.
- Use props in the kitchen for the finished project picture. A bowl of fruit or vase of flowers gives a nice finished touch and offers visual appeal. Keep the counters cleared of pens, paper, keys, etc.
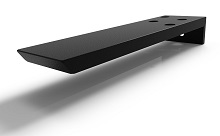
- If you are installing either the Standard Plus & Forward L bracket, take the picture so it shows the flange on the back side of your knee wall. If taken from the front this bracket looks too much like the standard bracket. Showing the installed bracket from the back side will add interest and make the picture more valuable in terms of marketability.
- An action shot means just that. Ideally this picture will show a person performing one of the following type of installation activities: measuring for bracket placement, routing out the knee wall, screwing the brackets into place, ensuring the brackets are level, etc.
Winners and prize monies will be awarded in time for Christmas!
|
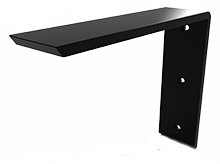
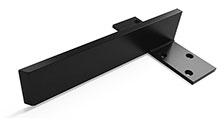
| Installation guide for Standard, Standard Plus and Forward L Brackets |
| |
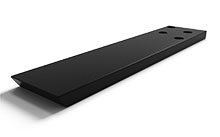
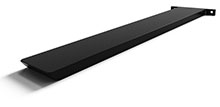
Countertop Support Bracket Installation Guide
Our Countertop Support Brackets are simple to install. Our "
standard countertop support bracket", "forward l countertop support bracket" and "side mount countertop support brackets" require a 2.5 inch wide by 1/2 inch deep channel is routed our chiseled out of the knee wall.
The bracket is then mounted into the channel with #12 wood screws that are provided with your purchase. As the countertop support brackets are being mounted they should be checked to ensure they are level with the knee wall and shimmed to level if necessary.
Builders glue (liquid nail) can be be applied to the mounting surface if desired to bond the countertop support to the granite.
Will my installer understand how to mount the countertop support brackets?
Most installers are familiar with our products. If not just print this page and hand it to them. Our countertop support brackets are easier to install than corbels and the installer will understand the instruction immediately.
How to install your countertop support brackets

The first method requires the following tools. A saw, wood chisel and level.
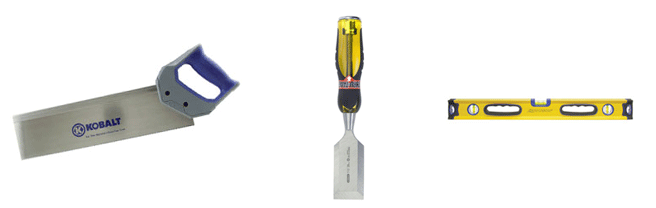
- Measure and mark the appropriate mounting locations on the cap of your knee wall. Start at 6 inches in from the edges and space the brackets 18 - 24 inches apart.
- Using a T-Square mark two diagonal lines that are 2 and 9/16th inches apart from each other at each mounting location.
- Using a hand saw, cut along each line to a depth of 1/2 inch.
- Using a wood chisel (1 inch is a good choice), remove the material between the lines you just cut creating a clean and level mounting channel. Be sure to remove all of the material in the mounting channel.
- Place the bracket into the mounting channel and affix the bracket to the knee wall using the included screws. Use ALL of the screws included. You can also cover the bottom of the mounting channel with Liquid Nail for extra strength if deemed necessary.
- Using a level ensure that the bracket is level with the knee wall. If necessary shim the bracket level.
The second method requires the following tools. A router, 1/2 inch "Top Bearing Flush Trim" router bit and level.
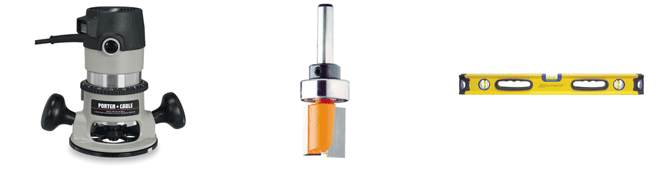
- Measure and mark the appropriate mounting locations on the cap of your knee wall.
- Using a T-Square mark a diagonal line at each mounting location.
- Use a 1/4 x 4 inch strip of wood as a router guide.
- Working left to right, align the inner edge of the router guide with the horizontal line you just marked and fasten the routing guide at that point.
- Using a Top Bearing Flush Trim router bit with a 1/2 inch deep cutting length, trim the excess wood out of the mounting surface. This should leave you with a clean, level channel for the bracket to be seated in. Be sure to remove any excess wood chips or saw dust from the mounting channel.
- Place the bracket into the mounting channel and affix the bracket to the cap using the included screws. Use ALL of the screws included. You can also cover the bottom of the mounting channel with Liquid Nail for extra strength if deemed necessary.
- Using a level ensure that the bracket is level with the knee wall. If necessary shim the bracket level.
Tips from our installers
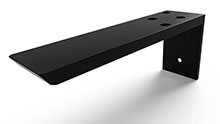
- Brackets that have side or back angles attached to them do not need a mounting channel to rest in as they are typically covered with sheet rock of some other surface material. Though you could create mounting channels for the additional mounting points it is much simpler to flush mount by trimming the sheet rock in that area and then apply a sheet rock patch.
- Be sure your knee wall or other object that you intend to use as a base for your granite countertop is well built and stable. If you're unsure consult a professional.
- We recommend pre-drilling all screw holes to prevent cracking studs. Though we off-set the screw hole positions to help avoid splits, pre-drilling is a good idea.
- Consider using Liquid Nail – it may seem like overkill considering the combined strength of the lumber and our half inch steel countertop support brackets. However the more surface area that is physically attached the stronger and more stable the joint will be for supporting granite countertops. Liquid Nail is an inexpensive extra touch for that extra measure of durability.
Hidden Countertop Supports for Knee and Pony Wall Applications
Hidden Countertop Supports for Kitchen Islands
Hidden Countertop Supports for Specialty Applications
Floating Wall Mount
Center Levered Bar Support
|
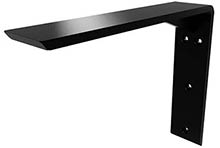
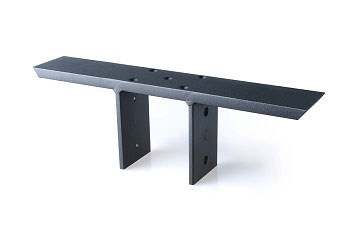
| Island Countertop Bracket Installation Guide |
| |
Countertop Support Bracket Installation Guide
Our Countertop Support Brackets are simple to install. Our "
standard countertop support bracket", "forward l countertop support bracket" and "side mount countertop support brackets" require a 2.5 inch wide by 1/2 inch deep channel is routed our chiseled out of the knee wall.
The bracket is then mounted into the channel with #12 wood screws that are provided with your purchase. As the countertop support brackets are being mounted they should be checked to ensure they are level with the knee wall and shimmed to level if necessary.
Builders glue (liquid nail) can be be applied to the mounting surface if desired to bond the countertop support to the granite.
Will my installer understand how to mount the countertop support brackets?
Most installers are familiar with our products. If not just print this page and hand it to them. Our countertop support brackets are easier to install than corbels and the installer will understand the instruction immediately.
How to install your countertop support brackets
The first method requires the following tools. A saw, wood chisel and level.
- Measure and mark the appropriate mounting locations on the cap of your knee wall. Start at 6 inches in from the edges and space the brackets 18 - 24 inches apart.
- Using a T-Square mark two diagonal lines that are 2 and 9/16th inches apart from each other at each mounting location.
- Using a hand saw, cut along each line to a depth of 1/2 inch.
- Using a wood chisel (1 inch is a good choice), remove the material between the lines you just cut creating a clean and level mounting channel. Be sure to remove all of the material in the mounting channel.
- Place the bracket into the mounting channel and affix the bracket to the knee wall using the included screws. Use ALL of the screws included. You can also cover the bottom of the mounting channel with Liquid Nail for extra strength if deemed necessary.
- Using a level ensure that the bracket is level with the knee wall. If necessary shim the bracket level.
The second method requires the following tools. A router, 1/2 inch "Top Bearing Flush Trim" router bit and level.
- Measure and mark the appropriate mounting locations on the cap of your knee wall.
- Using a T-Square mark a diagonal line at each mounting location.
- Use a 1/4 x 4 inch strip of wood as a router guide.
- Working left to right, align the inner edge of the router guide with the horizontal line you just marked and fasten the routing guide at that point.
- Using a Top Bearing Flush Trim router bit with a 1/2 inch deep cutting length, trim the excess wood out of the mounting surface. This should leave you with a clean, level channel for the bracket to be seated in. Be sure to remove any excess wood chips or saw dust from the mounting channel.
- Place the bracket into the mounting channel and affix the bracket to the cap using the included screws. Use ALL of the screws included. You can also cover the bottom of the mounting channel with Liquid Nail for extra strength if deemed necessary.
- Using a level ensure that the bracket is level with the knee wall. If necessary shim the bracket level.
Tips from our installers
- Brackets that have side or back angles attached to them do not need a mounting channel to rest in as they are typically covered with sheet rock of some other surface material. Though you could create mounting channels for the additional mounting points it is much simpler to flush mount by trimming the sheet rock in that area and then apply a sheet rock patch.
- Be sure your knee wall or other object that you intend to use as a base for your granite countertop is well built and stable. If you're unsure consult a professional.
- We recommend pre-drilling all screw holes to prevent cracking studs. Though we off-set the screw hole positions to help avoid splits, pre-drilling is a good idea.
- Consider using Liquid Nail – it may seem like overkill considering the combined strength of the lumber and our half inch steel countertop support brackets. However the more surface area that is physically attached the stronger and more stable the joint will be for supporting granite countertops. Liquid Nail is an inexpensive extra touch for that extra measure of durability.
Hidden Countertop Supports for Knee and Pony Wall Applications
Hidden Countertop Supports for Kitchen Islands
Hidden Countertop Supports for Specialty Applications
Floating Wall Mount
Center Levered Bar Support
|
| How do I contact you? |
| |
Please click here for our company contact information. |